Boat floor restoration

D-Racer

Founding Member
Founding Member
Joined
Nov 6, 2015
Posts
154
Likes
49
Points
128
Location
Central ND
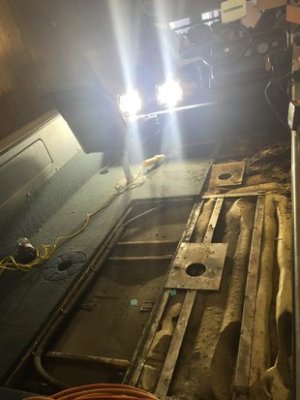
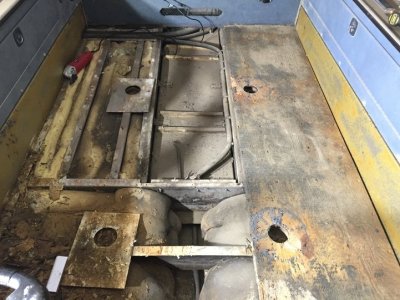
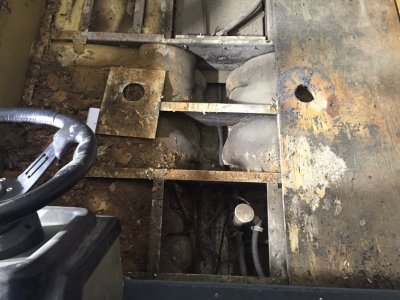
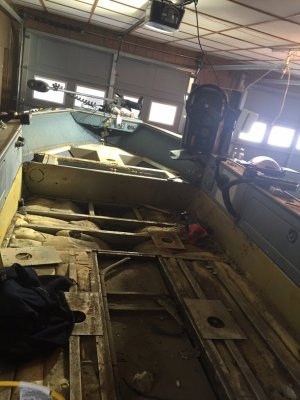
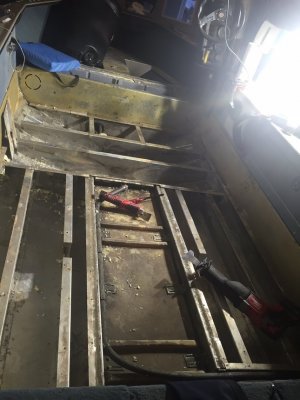
I used aluminum rivets on the bulk of the floor and used screws on the section that covered the fuel tank. Hoping this would be the one and only time I will need to redo the floor on this boat.


mrperch

Founding Member
Founding Member
Thread starter
Joined
Oct 9, 2015
Posts
130
Likes
1
Points
108
Location
Wishek ND
imagejpeg


- - - Updated - - -

imagejpeg


- - - Updated - - -

imagejpeg


- - - Updated - - -

imagejpeg
 

Attachments

image.jpg

eyexer

Founding Member
Founding Member
Joined
Apr 20, 2015
Posts
13,730
Likes
708
Points
438
Location
williston
Been down this road several times, twice on my own boats and three for hire.

Do not use green treat as AC2 is corrosive with aluminum when it gets wet. My understanding is, the only difference between marine grade plywood and regular plywood is that there are no air pockets between the laminations with marine grade. I've seen both used. I would spend the extra for the marine grade because when you are done you will swear to never do this again.

Like Guy said...a multitool will save you a lot of swearing. Console will only need to be freed from the floor, you don't necessarily need to take it out as you can slide the new flooring underneath it. if you have a strorage space under your console, many times, the new floor under the console can be screwed from the bottom of the support with a shorter screw... screw sucking it down.

Typically your livewell will sit on the boat frame and your floor will be on top of the flair/flange at the top edge of the live well. It is a good idea to put some sealant between the live well flange and your new floor. This way when water is splashing around in the well, it wont find its way between the live well and your floor ending up down in the hull.

Generally the floor will be in sections, depending on the degree of rot, try to get the pieces out whole and simply use them as pattern for you new floor. If you are putting down new carpet, pay for the factory quality stuff rather than the midgrade/Cabela's stuff, you will be happy you did in 2 years. Also if doing carpet, when you get to the little pieces (bow, fuel tank cowling, etc), carpet them before you install them.

Stainless steel screws and bolts are a must. Make sure you pre-drill you holes through the metal floor supports as the stainless steel screw heads will strip out much easier than a regular screw. An impact driver and proper size bit for the screws is a good idea. I've had good luck with the SS screws from fastenal. They may have to order them from another store so it could take a day to get them.

This is also a great time to inspect every wire in your boat since it is all open. Buy some shrink wrap and seal every conection you can find. If you find wire lying on the hull, secure them up so they are out of any water than may run through the hull. It will only take you a couple hours and save you frustration down the road with grounding/vibration issues. Also a good time to consider new battery trays/boxes, hatch pulls, live well plumbing, etc. You can take this stuff as far as you want.

Last but not least...take your time & spend extra for quality when you can. When you find youself getting pissed at a stubborn screw it's time to take a break. Don't expect this to be a weekend project.
marine grade plywood uses waterproof glue. regular plywood doesn't.

- - - Updated - - -

did this a year ago on my 1900 Pro-V. just about to start on my dad's Crestliner 1850 sportfish. not a fun job at all and a lot of work. but sure looks nice when done. Replace all your pumps, livewell hoses and add in the remote valves from flow-rite when you do it.
 

riverview

Founding Member
Founding Member
Joined
Jul 9, 2015
Posts
3,011
Likes
883
Points
398
finished my 20 foot Lund Alaskan. I got lucky and did a bunch of work to a carpenters pickup I had the boat stripped, he worked 13 days probably around 5 to 6 hours a day to cut all the wood for the floor build 2 live wells up front extend the front wood and build a storage compartment under the front vee, everything was covered in 80 mill marine vinyl. I had to use 4x10 sheets of 3/4 marine plywood to match what was there, with new seats I have around 1600.00 into it.
 

WT2121

Founding Member
Founding Member
Joined
May 25, 2015
Posts
217
Likes
16
Points
130
Location
Bismarck
My advice is to replace fuel fill hose. Ethanol gasoline eats standard fuel hose. Most boat dealers have hose for ethanol gasoline. Second don't use ethanol gasoline, not even 10%.


Lou63

Founding Member
Founding Member
Joined
Apr 12, 2015
Posts
638
Likes
22
Points
173
Location
Flaxton, ND
if your worried about filling the screw heads with your lining I have a couple ideas (brainfarts) vaseline works when painting window framework, just spread it on the glass and just spray away and when your done painting just use a scraper to remove the vaseline, so it may keep the liner out of the screw heads, or a bar of soap or a crayon or a wax candle rubbed on the screw to fill the slots so the liner doesn't fill them.

I purchased a glastron and I was going to redo the floor but then found a much better boat for less than the parts to fix the glastron. I did do a lot of research and the Iboats forums have some threads on this stuff.

not gonna do the glastron just going to find it a graveyard and sell the motor etc and build my ice house to fit the trailer, crank on, crank off skid type shack. going to shape it like a slide in the pickup camper with seats built in on both sides and storage on the end away from the door.
 

mrperch

Founding Member
Founding Member
Thread starter
Joined
Oct 9, 2015
Posts
130
Likes
1
Points
108
Location
Wishek ND
jpg.gif
IMG_0608.jpg (91.4 KB)

jpg.gif
IMG_0610.jpg (97.5 KB)

jpg.gif
IMG_0611.jpg (97.4 KB)

jpg.gif
IMG_0615.jpg (94.2 KB)

jpg.gif
IMG_0623.jpg (92.1 KB)


Finally done with the tearing out the foam!!!

- - - Updated - - -

Now I would like to know what sealer to put on the plywood?? brands?? Thinking just for the bottom side, I believe with using that tuff coat that I will not have to put sealer on the topside??
 

Attachments

IMG_0608.jpg IMG_0610.jpg IMG_0611.jpg IMG_0615.jpg IMG_0623.jpg

SDMF

Founding Member
Founding Member
Joined
Apr 24, 2015
Posts
10,943
Likes
664
Points
448
Were that my project, every wire and every hose would be new before I started buttoning things back up. Additionally, I'd have extra leads run from battery to helm up each side (so that you can isolate a marine band radio power source from everything else in order to decrease the risk of feedback through the fish-finders when you key the mic), from battery to bow, and from helm to bow. Wire is relatively cheap and very easy to string with everything out of your way. Some PVC tubes would be a good idea as well, it'd protect the wires and make it that much easier to string extras should the need ever arise.

I'd run 6-8Ga wire from the battery to the helm into a fuse block and wire in a master power switch. That'd eliminate all of your in-line fuses that will inevitably be buried somewhere once you begin re-assembly. It would also reduce the chances of forgetting about and leaving on a pump, fish finder, or lights and draining your battery. I'd build a cooler into the floor as well, even if it cost me a little storage space, it's mighty nice not having to step over/under/around a cooler all day.
 

Allen

Founding Member
Founding Member
Joined
Apr 24, 2015
Posts
10,516
Likes
1,540
Points
638
Location
Lincoln, kinda...
Wow, thanks so much for all the info... This will certainly help I am not much of a carpenter at all, but a friend who is fairly handy with things is going to help out.. I noticed that the foam underneath looks to be a bit water logged so thinking about tearing all that out and repouring as well. I wonder if they make anything to seal the rivets with once all that is ripped out beings I will be able to get at most of them?

There is something called "Ultima", or Ultimate that you can buy at Menards. It is a brush on sealant that should work well for sealing rivets from the inside of the hull. A couple summers ago a friend brought some horses out to my place and needed to use an old galvanized tank for water. The thing leaked like a sieve! I took and sand blasted the tank to remove most of the rust and then brushed this stuff on. Worked like a charm.

I still need to do this to my leaky canoe.
 

Recent Posts

Friends of NDA

Top Posters of the Month

  • This month: 191
  • This month: 157
  • This month: 146
  • This month: 137
  • This month: 117
  • This month: 95
  • This month: 93
  • This month: 93
  • This month: 88
  • This month: 80
Top Bottom