Boat Floor Replacement

deleted member

Founding Member
Joined
May 18, 2015
Posts
8,352
Likes
1,178
Points
488
Location
Devils Lake
i used marine plywood up front and on the casting deck i added to the back. but, i used that trex decking type stuff for the main floor. kind of has that stained wood look. price wise i can't remember if there was difference. but, one advantage is that i can pull and/or replace individual boards if i ever needed to without pulling the entire floor.


LBrandt

★★★★★ Legendary Member
Joined
Apr 3, 2016
Posts
11,284
Likes
2,355
Points
693
Location
SE ND
Start this project next November because, just because. You will thank me later.
 

Reprobait

Founding Member
Founding Member
Joined
May 17, 2015
Posts
3,283
Likes
1,073
Points
483
I would keep an eye on your transom. Lund and Crestliner from about 98-06 used regular plywood in the transom also. Bastards! I replaced mine due to rot in my 06 Crestliner last summer. It was stored in the garage but the design and the foam that they had sprayed in allowed water to just sit there next to the wood.
 

eyexer

Founding Member
Founding Member
Joined
Apr 20, 2015
Posts
13,742
Likes
736
Points
438
Location
williston
Pretty positive my 2000 Crestliner had marine grade plywood on the transom


ORCUS DEMENS

Founding Member
Founding Member
Joined
Oct 17, 2015
Posts
1,333
Likes
790
Points
358
Location
Minot
Late to jump on the bandwagon but agree with marine grade plywood only. Epoxy coat before putting vinyl or carpeting on. 3M-5200 not silicone, it is polyurethane and takes a while to dry but it will be on there for a long time. All fasteners should be stainless steel. Reinforce seat bases and correct/change wiring and anything else below. If you are undecided vinyl or carpet consider vinyl with snap down carpet in critical areas, easier clean up.
 

WT2121

Founding Member
Founding Member
Joined
May 25, 2015
Posts
224
Likes
21
Points
165
Location
Bismarck
Suggest you seal the plywood. I did a floor in a Lund years ago. Got help from a friend that had previously worked for a boat dealer. He sealed the plywood and we used marine grade plywood.


SDMF

Founding Member
Founding Member
Joined
Apr 24, 2015
Posts
11,478
Likes
1,477
Points
588
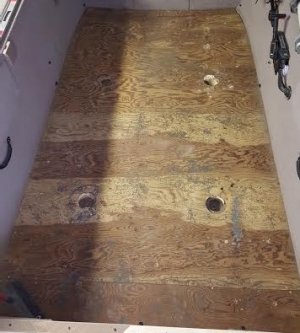
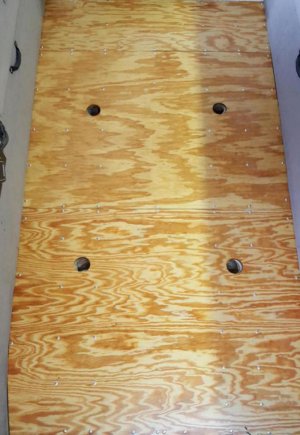
Marine plywood, seal with epoxy.

While the floor is out go look at a bunch of boats in the showrooms, see if there's any floorplan features you'd like to add, take some pics on your phone, maybe carry a tape measure, and then:

New everything underneath. Hoses, wiring, pumps, fuel sending unit, and cables. Wire in a master power switch if you don't currently have one. Now is the time to even out the boat's balance as well. You can shift batteries and fuel load forward or aft depending on how the boat currently carries it's load. Run 2-3 extra sets of wires from the batteries to the helm and from the helm to the bow so you can add accessories by merely adding wire ends.

Now is also the time to upgrade underneath. Potential upgrades:

Bigger fuel tank if the current on has ever been an issue. More storage that's better though out, maybe even tackle and rod organizers cyphered in. Bigger/insulated live well. Recirculator pump, oxygenator, In-Floor cooler. Re-think seat base placement. Batteries and onboard chargers. Upgrade the fuse panel to use the little 2-prong plastic top fuses instead of those infernal glass pieces of shit. Upgrade switches. Add some LED lighting inside including the live well.

Before you add vinyl/carpet to your new floor pieces, lay it all in the boat and decide where to put a few hatches so that if you ever do need to get at pumps, wiring, etc, you don't have to hire a Romanian contortionist to do the work.

We replaced the floor in my dad's early 80's 16' Yar-Craft. Put the trolling batteries in the nose to hold it down a little. Took the 2 9-gal fuel tanks off the transom and put a 16-18gal tank in the floor dead center. It really improved planing speed as well as ride in rough water. Upgraded the switches and the live well. Cleaned up the old wiring and pumps, and increased the length of the rod box.

The idea phase can usually be accomplished with 4-6 beers and about 2hrs of just staring at the inside of your boat and mumbling a lot.
 
Last edited:

Davy Crockett

Founding Member
Founding Member
Joined
Apr 22, 2015
Posts
15,386
Likes
2,670
Points
783
Location
Boondocks
Might consider putting in a wash-down pump when you have it tore apart if you go with vinyl flooring, On those hot days its fun to have water fights and cool off. The bonus is you always have clean boat and won't be swatting flies the next day.
 
Last edited:

D-Racer

Founding Member
Founding Member
Joined
Nov 6, 2015
Posts
196
Likes
89
Points
175
Location
Central ND
Replaced mine 3 years ago with marine board from Menards. Sealed the underside and coated the top with a non skid product from Overtons called Tuff Coat. Easy to apply and seems to be quite durable. BTW, good suggestions on checking things like wiring and hoses before new floor is installed and using old as templates..........hopefully in better shape then mine were. :(
 

SDMF

Founding Member
Founding Member
Joined
Apr 24, 2015
Posts
11,478
Likes
1,477
Points
588
Might consider putting in a wash-down pump when you have it tore apart

I meant to add that as well. Would be especially nice in May and early June when the hammer-handles on Devils are in full attack mode and have used shrimp coming outta both ends during the unhooking process. If one could bottle that crap I believe you could pave the interstate with it.


Allen

Founding Member
Founding Member
Joined
Apr 24, 2015
Posts
11,562
Likes
2,969
Points
783
Location
Lincoln, kinda...
Just remember, if you are going to add sealing coats of something like paint, etc. Or are going to have individual pieces of carpet wrapped sections, you will want to cut your pieces a kerf smaller so they still fit. It can be amazing at how much a couple coats of paint, or carpet wrapped on the edge will add to the dimensions of an otherwise perfectly fitted piece of wood.

Been there, learned from it. My current Lund's center floor piece that I've had out a few times is carpet wrapped and I've got to damn near jump on it to get it back in place, each and every time. Not sure why I bother to put the screws back in on that thing because it ain't going nowhere as snug as it fits.
 

defiant1

Honored Member
Joined
Jan 14, 2016
Posts
240
Likes
2
Points
110
Currently, I am in the middle of replacing the majority of the floor in my boat. All suggestions listed have merit based on what works for your current budget, time constraints and the work area (shop, garage, outside) your boat resides.

After I took up the old floor I inspected the stringers and supports that are attached to the hull. My aluminum boat is a '99 and I am not the original owner. Some of the welds on the linear supports (that are welded to the hull) had cracked. So, I got those repaired. Also, I reinforced the stringers with aluminum angle as well. I might install some pink foam board in the spaces where there is no spray foam to augment the buoyancy a bit. The space is approximately 24" x 60" x 4.5". I am still on the fence with this idea.

I replaced all fuel hose, fuel sending unit, installed a water separator filter, replaced bow livewell fill and drain hoses, and replaced stereo speakers as well.

I will use multiple layers of spar varnish to coat my plywood floor panels and will install 20 oz carpet. I thought about other flooring options, but carpet fit my situation.

I am using 5/8" exterior grade plywood for the floor. Nobody local had 5/8" marine grade plywood and I wasn't going to order it. The 5/8" plywood will match the floor portions I am not replacing (bow section and rear most portion under the rear deck). The original floor, I took out, I literally could have cleaned up and used again (no soft spots) and it wasn't covered in epoxy or painted either.

The floor I am replacing is basically 3 separate sections. I thought about wrapping each of the three sections, however the carpet that wraps underneath would cause the plywood to raise up around the perimeter and I would have to install a spacer in the center to make up the difference in height. Not to mention the seams would be uneven where the existing floor meets the new floor. The old carpet was one solid piece of carpet with no seams that did not wrap around the plywood. I may do that again so the plywood fits flat to the aluminum stringers and bracing when I attach it.

Also, I am on the fence on whether to use aluminum rivets or stainless steel fasteners to attach the floor. Quite a few of the original rivets had popped and that is one of the reasons I took up the floor. I bought larger diameter dome rivets to use but I do have SS screws available as well.

As a few forum members alluded to, this is a time sucker of a project. Nothing goes as easy as you think and simple things prove frustrating throughout.

I did keep the old carpet (it did not tear when removing) and old floor for a template. I hope to have the new floor cut and spar varnish applied by this Sunday evening. This should give me time to figure out what carpet configuration I want to use as well as what fasteners to use.

Good luck with your project.
d1
 

Attachments

boat carpet old floor.jpg boat carpet test fit.jpg boat carpet trimming.jpg boat floor new plywood.jpg boat carpet under floor.jpg boat carpet glued down3.jpg
Last edited:

Davy Crockett

Founding Member
Founding Member
Joined
Apr 22, 2015
Posts
15,386
Likes
2,670
Points
783
Location
Boondocks
If this was my old Lund I'd for sure notch out a bigger access hole to bilge area and make a cover for it. On mine you have to have to crawl under the splash pan and feel your way around a little hole. Then I'd put a float switch for the bilge pump under it if you leave your boat on the water unattended .
 

SDMF

Founding Member
Founding Member
Joined
Apr 24, 2015
Posts
11,478
Likes
1,477
Points
588
Did you rebuild a 1678 16 ft Yarcraft. If so do you have pics or info on the floor replacement.

Yes, 1678 side console. No exact info. Pretty sure we used either Moeller tank # 032518 or RDS # 59178 for the permanent in floor tank and ran a fuel fill just ahead of the helm to keep the line short, straight, and steeply down-hill. We built a battery box into the front deck just big enough for 2 group 27 trolling batteries. Left the factory live well in place, just re-sealed it to the new floor so it quit filling the hull up if you left the pump on :whaaaa:. For the side rod locker we just dug out foam to make it longer, wasn't exactly how I would've done it but it was Dad's boat. Only thing left under the rear skirt was the main battery and the 2-stroke oil tank. Re-wired the lights and pumps to a new switch panel. Dad wouldn't go for a master power switch or I'd have had everything tied to it.

Feel free to PM me if you have specific questions, you might jog my memory.


Recent Posts

Friends of NDA

Top Posters of the Month

  • This month: 243
  • This month: 70
  • This month: 61
  • This month: 58
  • This month: 54
  • This month: 46
  • This month: 37
  • This month: 37
  • This month: 27
  • This month: 27
Top Bottom